/*auto readmore*/ /*auto readmore*/ /* an hien script*/ // an hien password /*an hien ma chuong trinh cong tru */ /*Scrollbox thanh cuon*/ /***Nhung CODE***/ /* dòng xanh dòng trắng */ /* https://cdnjs.com/libraries/prism lay thu vien, can vao ten file ma goi 1. copy link vao vi du:prism-python.min.js 2. ten ngon nua la python */ /*=== New posts ===*/ /*header slider*/ /*=== bai viet lien quan===*/ /*===tabcode===*/

Học Python Qua Ví Dụ #016 - Dictionary Trong Python

  • Dictionary là gì
Kiểu dữ liệu lưu trữ trong dictionary gồm các giá trị Key và Value.


Chúng lưu trữ không theo một trận tự hay thứ tự sắp xếp nào cả. Khai báo chúng được định nghĩa bởi cặp dấu {}

Ví dụ:
net_device = {
	"device_type": "ios",
	"ip_addr": "192.168.0.1"
}

  • Thêm/sửa/xóa phần tử trong dictionary
Code:
net_device = {
	"device_type": "ios",
	"ip_addr": "192.168.0.1"
}
print(net_device)

# thêm key vendor có giá trị juniper vào dictionary
net_device ["vendor"] = "juniper"
print(net_device)

# thay đổi giá trị của dict
net_device["ip_addr"] = "192.168.0.254"
print(net_device)

# lấy giá trị ra khỏi dict
net_device.pop("vendor")
print(net_device)


Kết quả
C:\python>python Demo.py

{'device_type': 'ios', 'ip_addr': '192.168.0.1'}

{'device_type': 'ios', 'ip_addr': '192.168.0.1', 'vendor': 'juniper'}

{'device_type': 'ios', 'ip_addr': '192.168.0.254', 'vendor': 'juniper'}

{'device_type': 'ios', 'ip_addr': '192.168.0.254'}

C:\python>

  • Phương thức update trong Dictionary
Code:
net_device = {
	"device_type": "ios",
	"ip_addr": "192.168.0.1",
	"vendor" : "cisco",
}
print(net_device)

net_device_2 = {"model" : "sxr", "vendor" : "juniper"}

# giá trị của net_device_2 sẽ thêm vào net_device
net_device.update(net_device_2)
print(net_device)

Kết quả:
C:\python>python Demo.py

{'device_type': 'ios', 'ip_addr': '192.168.0.1', 'vendor': 'cisco'}
{'device_type': 'ios', 'ip_addr': '192.168.0.1', 'vendor': 'juniper', 'model': 'sxr'}

C:\python>

Với ví dụ trên, giá trị của net_device_2 sẽ được thêm vào net_device, nếu trong net_device đã tồn tại key thì giá trị của net_device_2 sẽ ghi đè lên giá trị của net_device. Đó là lý do giá trị mới của key vendor trong net_device là juniper thay cho cisco

  • Lặp trong dictionary
Code:
net_device = {
	"device_type": "ios",
	"ip_addr": "192.168.0.1",
	"vendor" : "cisco",
	"mode": "881"
}

# in ra danh sách các key trong dictionary
for key in net_device.keys():
	print (key)

print("-" * 20)
# in ra danh sách các giá trong dictionary
for value in net_device.values():
	print (value)

print("-" * 20)
# in ra key, value thông qua items
for key, value in net_device.items():
	print (key)
	print (value)
	print("-" * 20)

Kết quả:
C:\python>python Demo.py
device_type
ip_addr
vendor
mode
--------------------
ios
192.168.0.1
cisco
881
--------------------
device_type
ios
--------------------
ip_addr
192.168.0.1
--------------------
vendor
cisco
--------------------
mode
881
--------------------

C:\python>

  • Merge two dictionary
Với phương thức update giúp chúng ta có thêm giá dictionary và nếu key đã tồn tại trước đó thì giá trị của key đó sẽ bị thay thế bởi giá trị cập nhật sau hay còn gọi là ghi đè. 

Bây giờ chúng ta xây dựng hàm để cập thật thêm giá trị vào dictionary mà không ghi đè (như phương thức update) nếu key đã tồn tại.

Code:
def mergeDict(dict1, dict2):
   
   dict3 = {**dict1, **dict2}						# thực hiện nối 2 dict, nếu trùng key thì giá trị sẽ là giá trị của dict đứng sau (trường hợp này dict2)
   for key, value in dict3.items():					
       if key in dict1 and key in dict2:			# 2 dict có key giống nhau
            dict3[key] = [value , dict1[key]]	    # thêm value của dict1 vào dict 3

   return dict3

dict1 = {'R1': {'Eth0/0': '192.168.11.1 255.255.255.0'}}
dict2 = {'R1': {'Eth0/1': '192.168.12.1 255.255.255.0'}}

dict3 = mergeDict(dict1, dict2)						# gọi hàm merge
print('Dictionary sau khi merge:')
print(dict3)


Kết quả:
C:\python>python Demo.py
Dictionary sau khi merge:
{'R1': [{'Eth0/1': '192.168.12.1 255.255.255.0'}, {'Eth0/0': '192.168.11.1 255.255.255.0'}]}

Để kết quả dễ nhìn hơn chúng ta import thư viện pprint để in ra kết quả.

Code:
def mergeDict(dict1, dict2):
   
   dict3 = {**dict1, **dict2}						# thực hiện nối 2 dict, nếu trùng key thì giá trị sẽ là giá trị của dict đứng sau (trường hợp này dict2)
   
   for key, value in dict3.items():					
       if key in dict1 and key in dict2:			# 2 dict có key giống nhau
            dict3[key] = [value , dict1[key]]	    # thêm value của dict1 vào dict 3

   return dict3


dict1 = {'R1': {'Eth0/0': '192.168.11.1 255.255.255.0'}}
dict2 = {'R1': {'Eth0/1': '192.168.12.1 255.255.255.0'}}

dict3 = mergeDict(dict1, dict2)						# gọi hàm merge
print('Dictionary sau khi merge:')

from pprint import pprint	# import thư viện pprint
pprint(dict3)


Kết quả:
C:\python>python Demo.py
Dictionary sau khi merge:
{'R1': [{'Eth0/1': '192.168.12.1 255.255.255.0'},
        {'Eth0/0': '192.168.11.1 255.255.255.0'}]}

Xong!

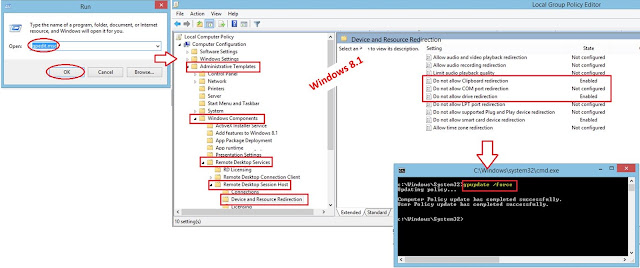
Windows, Remote Desktop Protocol (RDP) - Do Not Allow Drive/Clipboard Redirection Policies

Chúng ta điều khiển từ máy tính thông qua các chương trình remote trong đó có Remote Desktop của windows, thông qua đó chúng ta có thể chia sẽ tài nguyên qua lại giữa remote computer và client computer nhờ Remote Desktop Services session. Mặc định Remote Desktop Services session cho phép Drive/Clipboard Redirection.


Chúng ta có thể làm theo hướng như hình rồi remote desktop vào ỗ đĩa của máy chúng ta sẽ xuất hiện trên máy remote.


Với hình trên máy có tên VCK đang remote desktop vào và share 8 ổ đĩa nên trên máy đang bị remote hiện thị thêm các ổ đĩa của máy VCK nên chúng ta thấy chữ ... on VCK

Tham khảo cách mở Remote Destkop ở đây

Tuy nhiên vì lý do nào đó chúng ta muốn chặn việc Redirection Drive/Clipboard Redirection giữa remote computer và client computer.

Có nhiều cách để làm được điều này, tuy nhiên trong bài này chúng tôi hướng dẫn chặn thông qua policy.

Thực hiện chặn Redirection với máy tính bật RDP trên:
  • Win 8.1


  • Windows Server + domain controller:

đường dẫn khác, nhưng cách làm tương tự.
Group Policy Editor -> Computer Configuration\Policies\Administrative Templates\Windows Components\Remote Desktop Services\Remote Desktop Session Host\Device and Resource Redirection.

Làm xong bước này thử lại nhé các bạn, nếu gpupdate /force chưa ép-phê thì khởi động lại máy.

Xong!

Học Python Qua Ví Dụ #015 - Mail Merge/Trộn Mail Căn Bản Trong Python


Nên xem các bài dưới đây trước khi xem bài này

Mail Merge - Trộn Thư là tính năng rất hữu ích của Ms Word, tính năng này giúp chúng ta giảm thiểu thời gian trong các việc như: soạn hợp đồng, in phiếu lương, in giấy mời, thư cám ơn,... Hôm nay chúng ta tìm hiểu cách thực hiện Mail Merge trên python.

Có file Noidung.xlm có nội dung:
Hi: your_name
Your ID: your_id 
Your Password: your_password
Your OTP: your_otp

và file Danhsach.csv có nội dung:

Yêu cầu:
Các trường: your_name, your_id, your_password, your_otp của file Noidung.xlm sẽ thay đổi, mỗi dòng trong file Danhsach.csv sẽ được điền vào các trường tương ứng ở file Noidung.xlm. Kết quả tương tự như hình bên dưới
 

Nhận xét: 
Chúng ta thấy phần nội dung của file Noidung.xlm được lặp lại 6 lần (tùy thuộc vào số lượng dòng trong file Danhsach.csv). Nên file Noidung.xlm sẽ được mở trước sau đó mở file Danhsach.csv và sẽ có sự đi lặp lại khi xử lý file này.

Thực hiện:
Code:

with open ("Noidung.xml","r") as rf:
	noidung = rf.read()

	with open ("danhsach.csv","r") as rf_ds:
		
		for line_ds in rf_ds.readlines():
			fiedls_ds = line_ds.split(",")
			# đảm bảo khi thực hiện mỗi bước nhảy của vòng lặp nội dung file mới là đúng nội dung ban đầu của file Noidung.xml và
			noidung_moi = noidung
			'''
			Thực hiện thay thế
			Nếu thấy các trường:your_name, your_id, your_password, your_otp 
			thì thay thế bằng các trường tương ứng trong file danh sách
			'''
			noidung_moi = noidung_moi.replace("your_name",fiedls_ds[1])
			noidung_moi = noidung_moi.replace("your_id",fiedls_ds[2])
			noidung_moi = noidung_moi.replace("your_password",fiedls_ds[3])
			noidung_moi = noidung_moi.replace("your_otp",fiedls_ds[4])
			print(noidung_moi)			

Kết quả:
C:\python>python Demo.py
Hi: Nguyen Van Troi
Your ID: id2020
Your Password: 112233
Your OTP: aabbcc

Hi: Tran Van Luong
Your ID: id2121
Your Password: 445566
Your OTP: ddeeff

Hi: Truong Viet Hoang
Your ID: id2222
Your Password: 778899
Your OTP: gghhkk

Hi: Cong Vuong
Your ID: id2323
Your Password: 223344
Your OTP: xxyyzz

Hi: Tien Linh
Your ID: id2424
Your Password: 334455
Your OTP: aawwqq

Hi: Van Quyet
Your ID: id2525
Your Password: 556677
Your OTP: ppkkll

C:\python>


Với code trên chúng ta thấy từ dòng 15 đến dòng 18 chúng ta có thể thay bằng vòng lặp và các trường: your_name, your_id, your_password, your_otp có thể đưa vào biến list sẽ thích hợp hơn, và code sẽ gọn hơn.

Code:
# Định nghĩa biến key_word là một list gồm các key word sẽ được thay thế

key_word = ["No.", "your_name", "your_id","your_password", "your_otp"]

with open ("Noidung.xml","r") as rf:
	noidung = rf.read()

	with open ("danhsach.csv","r") as rf_ds:
		
		rf_ds.readline() # Bỏ dòng đầu tiên, vì dòng đầu tiên là dòng tiêu đề
		
		for line_ds in rf_ds.readlines():
			fiedls_ds = line_ds.split(",")
			# đảm bảo khi thực hiện mỗi bước nhảy của vòng lặp nội dung file mới là đúng nội dung ban đầu của file Noidung.xml và
			noidung_moi = noidung
			
			#tạo vòng lặp chạy từ 1 cho đến hết chiều dài của biến key_word
			for i in range(1, len(key_word),1):
				noidung_moi = noidung_moi.replace(key_word[i],fiedls_ds[i])				
			print(noidung_moi))						


Xong!
 

Học Python Qua Ví Dụ #014 Bài Tập - Mail Merge Xử Lý File Trong Python

Yêu Cầu:
Trộn và nối các trường tương ứng trong file ListDevices.csv vào file zbx_export_hosts.xml, cụ thể là mỗi một dòng của file ListDevices.csv điền vào các biến ở các dòng 12, 13, 14, 17, 22 và 27 để tạo file mới có tên zbx_export_hosts_MOI.xml

Nội dung file zbx_export_hosts.xml

Nội dung file ListDevices.csv


Nhận xét: Chúng ta thấy trong file zbx_export_hosts.xml từ dòng 11 cho đến dòng 32 đó là cấu tạo để định nghĩa một host trong file này và cho phép lặp lại. Nên chúng tôi đưa ra đề xuất giải quyết bài toán này là:

1. Tách file ban đầu ra làm 3 file nhỏ: 
- Từ dòng đầu tiên đến dòng thứ 10 là file: zbx_export_hosts_1.xml
- Từ dòng thứ 11 đến dòng thứ 32 là file: zbx_export_hosts_2.xml
- Từ dòng thứ 33 đến hết file là file: zbx_export_hosts_3.xml

2. Thực hiện nối các biến tương ứng theo yêu cầu đề bài và lưu lại với tên file mới là zbx_export_hosts_2EDIT.xml

3. Thực hiện nối 3: zbx_export_hosts_1.xml, zbx_export_hosts_2EDIT.xml, zbx_export_hosts_3.xml thành file zbx_export_hosts_MOI.xml

Thực Hiện:

1. Tách file ban đầu ra làm 3 file nhỏ: 
- Từ dòng đầu tiên đến dòng thứ 10 là file: zbx_export_hosts_1.xml
- Từ dòng thứ 11 đến dòng thứ 32 là file: zbx_export_hosts_2.xml
- Từ dòng thứ 33 đến hết file là file: zbx_export_hosts_3.xml

Code: 
f = open("zbx_export_hosts.xml", "r")
i = 0
cont1 =[]
for pl in f: # đọc cho đến hết file
	if i < 10:
		with open("zbx_export_hosts_1.xml","a") as f1:
			f1.write(pl)
	elif i < 32:
		with open("zbx_export_hosts_2.xml","a") as f2:
			f2.write(pl)
	else:
		with open("zbx_export_hosts_3.xml","a") as f3:
			f3.write(pl)
	i += 1
f.close

2. Thực hiện nối các biến tương ứng theo yêu cầu đề bài và lưu lại với tên file mới là zbx_export_hosts_2EDIT.xml

Code:
'''
định nghĩa list key_word có nội_dung/giá trị là các key word cần thay thế
Vì trong file ListDevices.csv có cột đầu tiên là No. số thứ tự không dùng trong việc thay thế
Nên thêm key No. để biến i trong vòng lặp for dễ hiểu hơn
Key No. sẽ không dùng
'''
key_word = ["No.", "host12","name13","des14","Temp17","Group22","ip_addr27"]

with open ("zbx_export_hosts_2.xml","r") as f:
	noidung = f.read()
	
	with open("ListDevices.csv","r") as fld:
		fld.readline() # bỏ dòng đầu tiên

		for line_dev in fld.readlines(): 
			fiedl_dev = line_dev.split(",")		# tách mỗi dòng thành 1 list	
			noidung_moi = noidung
			for i in range(0,len(key_word),1): 
				
				# thay thế tất cả các key vào nội dung 
				noidung_moi = noidung_moi.replace(key_word[i], fiedl_dev[i])

			# ghi file sau khi thay thế xong, give vào cuối file
			with open ("zbx_export_hosts_2EDIT.xml","a") as wf:
				wf.write(noidung_moi) 


3. Thực hiện nối 3: zbx_export_hosts_1.xml, zbx_export_hosts_2EDIT.xml, zbx_export_hosts_3.xml thành file zbx_export_hosts_MOI.xml

Code:
#định nghĩa list gồm tên của file cần nối vào file mới
files_list = ["zbx_export_hosts_1.xml", "zbx_export_hosts_2EDIT.xml","zbx_export_hosts_3.xml"]

with open ("zbx_export_hosts_MOI.xml","a") as wf:
	for i in range(0,len(files_list),1):
		
        with open (files_list[i],"r") as rf:
			content = rf.read()
			wf.write(content)


Tham khảo file sau khi nối zbx_export_hosts_MOI.xml

Xong!

Học Python Qua Ví Dụ #013 Bài Tập - While, For - Convert MAC Trong Python

Yêu cầu:

1. Convert Cisco to Windows MAC - Có bảng arp yêu cầu lấy ra cột mac address (định dạng cisco: xxxx.xxxx.xxxx) và chuyển sang định dạng MAC của Windows (xx:xx:xx:xx:xx:xx) 
Nội dung list

2. Convert Windows MAC to Cisco MAC

Thực Hiện:

1. Convert Cisco to Windows MAC 
Code:
arp_table = [
 ('10.220.88.1', '0062.ec29.70fe'),
 ('10.220.88.20', 'c89c.1dea.0eb6'),
 ('10.220.88.21', '1c6a.7aaf.576c'),
 ('10.220.88.28', '5254.aba8.9aea'),
 ('10.220.88.29', '5254.abbe.5b7b'),
 ('10.220.88.30', '5254.ab71.e119'),
 ('10.220.88.32', '5254.abc7.26aa'),
 ('10.220.88.33', '5254.ab3a.8d26'),
 ('10.220.88.35', '5254.abfb.af12'),
 ('10.220.88.37', '0001.00ff.0001'),
 ('10.220.88.38', '0002.00ff.0001'),
 ('10.220.88.39', '6464.9be8.08c8'),
 ('10.220.88.40', '001c.c4bf.826a'),
 ('10.220.88.41', '001b.7873.5634')]
for ip_addr, mac_addr in arp_table: 
    mac_addr = mac_addr.split(".")
    mac_addr = "".join(mac_addr)
    mac_addr = mac_addr.upper() # chuyển sang chữ hoa
    print()
    new_mac = []  # khởi tạo list rỗng
    while len(mac_addr) > 0: # khi độ dài của MAC address lớn hơn 0
        entry = mac_addr[:2] # lấy 2 ký tự đầu tiên
        mac_addr = mac_addr[2:] # MAC address mới sẽ là chuỗi ký tự từ vị trí thứ 3 đến hết chuỗi (ở đây chiều dài của mac_addr đã giảm đi 2)
        new_mac.append(entry) # cứ 2 ký tự nối là thành phần của list

    new_mac = ":".join(new_mac)
    print(new_mac)

Kết quả:
C:\python>python Demo.py

00:62:EC:29:70:FE

C8:9C:1D:EA:0E:B6

1C:6A:7A:AF:57:6C

52:54:AB:A8:9A:EA

52:54:AB:BE:5B:7B

52:54:AB:71:E1:19

52:54:AB:C7:26:AA

52:54:AB:3A:8D:26

52:54:AB:FB:AF:12

00:01:00:FF:00:01

00:02:00:FF:00:01

64:64:9B:E8:08:C8

00:1C:C4:BF:82:6A

00:1B:78:73:56:34

C:\python>

2. Convert Windows MAC to Cisco MAC 

Code:
mac_add = "00:62:EC-29-70-FE"
mac_add = mac_add.replace(":","")
mac_add = mac_add.replace("-","").lower()
print()
new_mac = []
while len(mac_add) > 0:
	entry = mac_add [:4]
	mac_add = mac_add [4:]
	new_mac.append(entry) 

new_mac = ".".join(new_mac)
print(new_mac)

Kết quả:
C:\python>python Demo.py

0062.ec29.70fe

C:\python>
 
Xong!
/*header slide*/