/*auto readmore*/ /*auto readmore*/ /* an hien script*/ // an hien password /*an hien ma chuong trinh cong tru */ /*Scrollbox thanh cuon*/ /***Nhung CODE***/ /* dòng xanh dòng trắng */ /* https://cdnjs.com/libraries/prism lay thu vien, can vao ten file ma goi 1. copy link vao vi du:prism-python.min.js 2. ten ngon nua la python */ /*=== New posts ===*/ /*header slider*/ /*=== bai viet lien quan===*/ /*===tabcode===*/

Zabbix, Cấu Hình Zabbix Cơ Bản / SNMP Template - Monitoring Graph 3/5

Yêu cầu:
1. Cấu hình SNMP trên Windows
2. Cấu hình SNMP trên Cisco IOS
3. Add Host Monitor SNMP trên Zabbix

Thực hiện
1. Cấu hình SNMP trên Windows

  • Cài SNMP bằng Windows PowerShell
PS C:\Users\Administrator> import-module servermanager
PS C:\Users\Administrator> Install-WindowsFeature SNMP-Service -IncludeManagementTools
Success Restart Needed Exit Code Feature Result
------- -------------- --------- --------------
True No Success {Feature Administration Tools, SNMP Tools,...

  • Kiểm tra sau khi cài đặt
PS C:\Users\Administrator> Get-WindowsFeature SNMP-Service
Display Name Name Install State
------------ ---- -------------
[X] SNMP Service SNMP-Service Installed

  • Xem thông tin trước khi cấu hình
PS C:\Users\Administrator> Get-ChildItem HKLM:\SYSTEM\CurrentControlSet\Services\SNMP\Parameters\
Hive: HKEY_LOCAL_MACHINE\SYSTEM\CurrentControlSet\Services\SNMP\Parameters
Name Property
---- --------
ExtensionAgents W3SVC : Software\Microsoft\W3SVC\CurrentVersion
PermittedManagers 1 : localhost
RFC1156Agent sysServices : 76
sysLocation :
sysContact :
ValidCommunities

  • Thiết lập SNMP Contract có tên là public
Set-ItemProperty -Path HKLM:\SYSTEM\CurrentControlSet\Services\SNMP\Parameters\RFC1156Agent\ -Name sysContact -Value public

  • Thiết lập Community là public và Read-only cho Community
Set-ItemProperty -Path HKLM:\SYSTEM\CurrentControlSet\Services\SNMP\Parameters\ValidCommunities\ -Name public 4

  • Cho phép IP 192.168.0.222 mới có thể thiết lập SNMP vào server này
Set-ItemProperty -Path HKLM:\SYSTEM\CurrentControlSet\Services\SNMP\Parameters\PermittedManagers\ -Name 2 -Value 192.168.0.222

  • Khởi động SNMP serves
Restart-Service SNMP -Verbose

  • Kiểm tra thông tin đã cấu hình
PS C:\Users\Administrator> Get-ChildItem HKLM:\SYSTEM\CurrentControlSet\Services\SNMP\Parameters\
    Hive: HKEY_LOCAL_MACHINE\SYSTEM\CurrentControlSet\Services\SNMP\Parameters
Name                                  Property
----                                        --------
ExtensionAgents                 W3SVC : Software\Microsoft\W3SVC\CurrentVersion
PermittedManagers              1 : localhost
                                              2 : 192.168.0.222
RFC1156Agent                     sysServices : 76
                                              sysLocation :
                                              sysContact  : public
TrapConfiguration
ValidCommunities                public : 4
PS C:\Users\Administrator>

  • Đảm bảo port 161 UDP được cho phép trên Firewall của windows
netsh advfirewall firewall add rule name="Allow Port 161 UDP" dir=in action=allow protocol=UDP localport=161


Cấu hình GUI tham khảo ở đây


2. Cấu hình SNMP trên Cisco IOS

Version 2
snmp-server community public ro

Version 3
snmp-server group SNMPGroup v3 priv
snmp-server user SNMPUser SNMPGroup v3 auth md5 snmpPASSWORD123 priv des snmpKEY123
snmp-server host 192.168.0.222 version 3 auth SNMPUser

Tham khảo bài cấu hình SNMP trên cisco có giải thích ở đây

3. Add Host Monitor SNMP trên Zabbix

  • SNMP Version 2
Windows:

Cisco IOS:


  • Kiểm tra xem zabbix đã kết nối được switch chưa:
- Cài đặt tool trên zabbix:
sudo yum install net-snmp net-snmp-utils


- Kiểm tra:
snmpwalk -v2c -c public 192.168.100.6  1.3.6.1.2.1.1.1

- Kết quả thành công:
[root@zabbix5 ~]# snmpwalk -v2c -c public 192.168.100.6  1.3.6.1.2.1.1.1
SNMPv2-MIB::sysDescr.0 = STRING: Cisco IOS Software, C2960 Software (C2960-LANLITEK9-M), Version 15.2(7)E2, RELEASE SOFTWARE (fc3)
Technical Support: http://www.cisco.com/techsupport
Copyright (c) 1986-2020 by Cisco Systems, Inc.
Compiled Sat 14-Mar-20 17:53 by prod_rel_team

tìm hiểu RFC1213 để biết thêm về dãy số 1.3.6.1.2.1.1.1   hoặc đây
  • SNMP Version 3
- Tìm và Download templates cho thích hợp với thiết bị cần monitoring (SNMPv3 không tích hợp sẵn trong Zabbix)
- Import templates 

file import trong lab 

- Add host:

Chúng ta thấy SNMP enable xanh có nghĩa thiết lập kết nối SNMP thành công.

Cách xem monitor tương tự lab trước
Xong!

Network Automation #005 - Netmiko Config Changes - OSPF Multiple Areas

Nên xem các bài dưới đây trước khi xem bài này:


Sơ đồ lab:


Yêu Cầu:

Dùng thư viện Netmiko SSH vào các route để cấu hình OSPF đảm bảo mạng hội tụ (tất cả các IP sơ đồ có thể ping thấy nhau)


Chuẩn bị:

  • Đấu nối interface management: Các interface Et0/0 của tất cả các router nối vào lớp mạng 192.168.0.0/24, lớp mạng này chỉ dùng trong việc quản lý thiết bị, không tham gia vào quá trình định tuyến của các router trong sơ đồ mạng.

  • Cấu hình căn bản: trên các router đảm bảo netmiko: 192.168.0.48 có thể ssh vào được các router


Thực hiện:

  • Chuẩn bị file cấu hình mẫu:
R1.txt
interface e0/2
ip address 192.168.14.1 255.255.255.0
no shutdown
exit
interface e0/3
ip address 192.168.13.1 255.255.255.0
no shutdown
exit
interface e0/1
ip address 192.168.123.1 255.255.255.0
no shutdown
exit
interface Lo0
ip address 172.16.1.1 255.255.255.0
no shutdown
exit
!
router ospf 1
router-id 1.1.1.1
exit
!
int rang e0/1 ,e0/3, lo 0
ip ospf 1 are 0
exit
int rang e0/2
ip ospf 1 are 1
exit
end
wri

R2.txt
interface e0/1
ip address 192.168.123.2 255.255.255.0
no shutdown
exit
interface Lo0
ip address 172.16.2.1 255.255.255.0
no shutdown
exit
!
router ospf 1
router-id 2.2.2.2
exit
!
int rang e0/1 
ip ospf 1 are 0
exit
int lo 0
ip ospf 1 are 2
exit
end
wri
R3.txt
interface e0/3
ip address 192.168.13.3 255.255.255.0
no shutdown
exit
interface e0/1
ip address 192.168.123.3 255.255.255.0
no shutdown
exit
interface Lo0
ip address 172.16.3.1 255.255.255.0
no shutdown
exit
!
router ospf 1
router-id 3.3.3.3
exit
!
int rang e0/1 ,e0/3, lo 0
ip ospf 1 are 0
exit
end
wri

R4.txt
interface e0/2
ip address 192.168.14.4 255.255.255.0
no shutdown
exit
interface Lo0
ip address 8.8.8.8 255.255.255.0
no shutdown
exit
!
router ospf 1
router-id 4.4.4.4
exit
!
int rang e0/2
ip ospf 1 are 1
exit
int lo 0
ip ospf 1 are 1
exit
end
wri

  • Code:
from netmiko import ConnectHandler 
'''
Thực hiện import file cấu hình:
- R1.txt vào R1
- R2.txt vào R2
- R3.txt vào R3
- R4.txt vào R4
'''

ios_device = {} 				# định nghĩa dictionnay rỗng
cfg_device = "R1,R2,R3,R4"		# danh sách các Router cần cấu hình
cfg_device = cfg_device.split(",")

def send_config_file(txt):
	
	print(f"Dang ket noi vao IP:'{values[1]}' voi Username: '{values[2]}'")	

	net_connect = ConnectHandler(**ios_device)			# khởi tạo kết nối đến router
	output = net_connect.send_config_from_file(txt) 	# thực hiện import cấu hình vào router
	print(f"Da import file cau hinh:'{txt}' OSPF vao IP: '{values[1]}' thanh cong!")
	print("-" * 80)
	#print(txt)       
      
with open ("device_listOSPF.csv","r") as rfile: 
	keys = rfile.readline().split(",")
	values = rfile.read()
	x = 0  # khởi tạo biến đếm
	for values in values.splitlines(): 
		values = values.split(",") 
		for i in range(1,len(keys)-1,1): 
			ios_device[keys[i]] = values[i]  
		
		send_config_file(cfg_device[x] + ".txt")
		x += 1


  • Kết quả:
C:\python>python Demo.py
Dang ket noi vao IP:'192.168.0.1' voi Username: 'admin'
Da import file cau hinh:'R1.txt' OSPF vao IP: '192.168.0.1' thanh cong!
--------------------------------------------------------------------------------
Dang ket noi vao IP:'192.168.0.2' voi Username: 'admin'
Da import file cau hinh:'R2.txt' OSPF vao IP: '192.168.0.2' thanh cong!
--------------------------------------------------------------------------------
Dang ket noi vao IP:'192.168.0.3' voi Username: 'admin'
Da import file cau hinh:'R3.txt' OSPF vao IP: '192.168.0.3' thanh cong!
--------------------------------------------------------------------------------
Dang ket noi vao IP:'192.168.0.4' voi Username: 'admin'
Da import file cau hinh:'R4.txt' OSPF vao IP: '192.168.0.4' thanh cong!
--------------------------------------------------------------------------------
[Finished in 32.6s]


Các common thường sử dụng trong phương thức netmiko:

  • net_connect.send_command() - Send command down the channel, return output back (pattern based)
  • net_connect.send_command_timing() - Send command down the channel, return output back (timing based)
  • net_connect.send_config_set() - Send configuration commands to remote device
  • net_connect.send_config_from_file() - Send configuration commands loaded from a file
  • net_connect.save_config() - Save the running-config to the startup-config
  • net_connect.enable() - Enter enable mode
  • net_connect.find_prompt() - Return the current router prompt
  • net_connect.commit() - Execute a commit action on Juniper and IOS-XR
  • net_connect.disconnect() - Close the connection
  • net_connect.write_channel() - Low-level write of the channel
  • net_connect.read_channel() - Low-level write of the channel
Xong!

Học Python Qua Ví Dụ #009 - Using Join, Replace - Nối, Thay Thế Trong Python

Yêu cầu:
1. Join:
2. Replace


Thực hiện:

1. Join: phương thức nối các sequence thành nội chuỗi

Code:
mac_addr ="08-00-27-00-E8-26"
print()
print("Chuoi ban dau: ",mac_addr)
mac_addr = mac_addr.split("-") # chuyển chuổi qua list, căn cứ vào dấu - để tách
print()
mac_addr_new = ":".join(mac_addr) # nối dấu hai chấm vào biến list mac_addr
print("Sau khi them sau HAI CHAM vao: ",mac_addr_new)

Kết quả:
C:\python>python Demo.py
Chuoi ban dau:  08-00-27-00-E8-26

Sau khi them sau HAI CHAM vao:  08:00:27:00:E8:26

C:\python>

2. Replace: phương thức tìm và thay thế chuỗi cũ bằng chuỗi mới

Code:
mac_addr ="08-00-27-00-E8-26"
print()
mac_addr = mac_addr.replace("-",":") # tìm nếu trong chuỗi có ký tự '-' thì thay bằng ':'
print(mac_addr)

Kết quả:
C:\python>python Demo.py
08:00:27:00:E8:26

C:\python>

Xong! 

Zabbix, Cấu Hình Zabbix Cơ Bản / Agent Template - Monitoring Graph 2/5

Yêu cầu:
1. Cài đặt Zabbix Agent trên Windows
2. Cài đặt Zabbix Agent trên CentOS
3. Add Host Monitor Agent trên Zabbix
4. Monitoring trên Graph Zabbix

Thực hiện:
1. Cài đặt Zabbix Agent trên Windows
  • Download Zabbix Agent  chọn phiên thích hợp với zabbix server rồi download về, ở đây chúng tôi chọn 5.0.1 


  • Chỉnh sửa file zabbix_agentd.conf
Giải nén lên máy windows cần cài đăt Zabbix Agent, tìm và sửa server = 192.168.0.222 là địa chỉ của Zabbix server

# Default:
# Server=

Server=192.168.0.222

### Option: ListenPort

  • Cài Zabbix Agent Service
Cài đặt zabbix agentd chạy như là service của windows 

C:\Zabbix\bin>zabbix_agentd.exe -c C:\Zabbix\conf\zabbix_agentd.conf  --install
zabbix_agentd.exe [780]: service [Zabbix Agent] installed successfully
zabbix_agentd.exe [780]: event source [Zabbix Agent] installed successfully 
C:\Zabbix\bin>zabbix_agentd.exe --start
zabbix_agentd.exe [4444]: service [Zabbix Agent] started successfully

C:\Zabbix\bin>


  • Đảm bảo server ở trạng thái Running (Mở Run -> Services.msc)


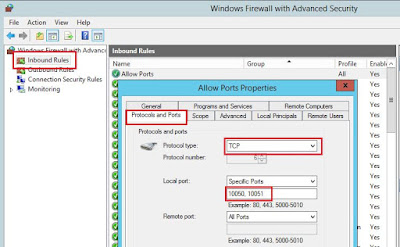
  • Đảm bảo port 10050 và 10051 allow trên zabbix agent
Thực hiện trên PowerShell
netsh advfirewall firewall add rule name="Allow Ports" dir=in action=allow protocol=TCP localport=10050,10051

Mở Run -> firewall.cpl để kiểm tra


2. Cài đặt Zabbix Agent trên CentOS
  • Thiết lập quyền cho SELinux
sudo setenforce 0
sudo sed -i 's/^SELINUX=.*/SELINUX=permissive/g' /etc/selinux/config
reboot

  • Cài đặt zabbix agent
sudo yum install -y https://repo.zabbix.com/zabbix/5.0/rhel/7/x86_64/zabbix-release-5.0-1.el7.noarch.rpm
sudo yum install zabbix-agent

  • Đảm bảo zabbix agent sẽ khởi động cùng CentOS và khởi động zabbix
sudo systemctl enable zabbix-agent
sudo systemctl start zabbix-agent

  • Chỉnh sửa file /etc/zabbix/zabbix_agentd.conf  trỏ về zabbix server
vim /etc/zabbix/zabbix_agentd.conf
#Server=[Zabbix server IP]
#Hostname=[ Hostname of client system ]
Server=192.168.0.222
Hostname=LAB_Server
Noted: sau khi sửa xong nhấn:wq để lưu lại và thoát thoải vim

  • Đảm bảo port 10051 và 10050 TCP được cho phép trên firewall của CentOS
sudo firewall-cmd --add-port={10051/tcp,10050/tcp} --permanent
sudo firewall-cmd --reload

  • Khởi động lại Zabbix agent
sudo systemctl restart zabbix-agent

3. Add Host Monitor Agent trên Zabbix

Chúng ta có thể định nghĩa Group host riêng cho nhóm cần giám sát bằng agent (nhằm mục đích dễ quản lý)
Cũng tư tương như phần add host ở ICMP (chú ý phần port cho trùng khớp với cài đặt agent bên trên nhé các bạn)
  • Nếu host là Windows:
Trong phần templates chọn -> Template OS Windows by Zabbix Agent. Các bước thực hiện như hình:

Nếu host là CentOS:
Trong phần templates chọn -> Template OS Linux Zabbix Agent (vì trong lab này chúng tôi chọn chính máy server zabbix nên chọn thêm Template App Zabbix Server và IP là 127.0.0.1-localhost). Các bước thực hiện như hình:

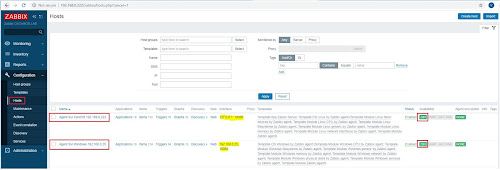
Kết quả sau khi thêm 2 host agent cần monitor, chúng ta thấy ZBXAvailability sáng lên đó là kết nối Agent thành công.


4. Monitoring trên Graph Zabbix

Chọn mục Monitoring -> hosts chúng ta thấy zabbix liệt kê ra những nhứ mà nó thu thập được từ zabbix agent kể cả lỗi và không lỗi

Ví dụ chọn Graphs của host 192.168.0.25 chúng ta thấy các thông tin được thể hiện bằng biểu đồ rất cụ thể

Ở mục Problems nó cũng liệt kê ra các lỗi nếu có, ví dụ với hình dưới nó thông báo tên service bị lỗi là gì, bị lỗi lúc nào ....

Cách hành xử với lỗi thế nào hẹn các bạn ở các bài viết sau.

Xong!

LAB OSPF Multiple Areas

Sơ đồ lab:


Yêu Cầu:

1. Thực hiện đấu nối dây và đặt ip như sơ đồ

2. Cấu hình OSPF đảm bảo tất cả các IP có thể ping thấy nhau

3. Hiệu chỉnh Router - ID cho các router là:

  • R1: 1.1.1.1
  • R2: 2.2.2.2
  • R3: 3.3.3.3
  • R4: 4.4.4.4

4. Hiệu chỉnh quá trình bình bầu DR/BDR kết nối giữa:

  • R1-R2-R3:  đảm bảo R1 là DR; R2 là BDR
  • R1-R4: đảm bảo R1 luôn là DR

5. Hiệu chỉnh metric để R3 đi đến Loopback0 của R4 hay R3 đến ip 8.8.8.8 phải đi qua cổng E0/3 của R1


Thực Hiện:

1. Thực hiện đấu nối dây và đặt ip như sơ đồ

R1:

enable
conf t
hostname R1
ip domain name OSPF.lab

username admin privilege 15 password admin1234

line vty 0 4
login local
transport input ssh
crypto key generate rsa general-keys modulus 1024
ip ssh version 2

interface e0/2
ip address 192.168.14.1 255.255.255.0
no shutdown
exit
interface e0/3
ip address 192.168.13.1 255.255.255.0
no shutdown
exit
interface e0/1
ip address 192.168.123.1 255.255.255.0
no shutdown
exit
interface Lo0
ip address 172.16.1.1 255.255.255.0
no shutdown
exit
do wri

R2:
enable
conf t
hostname R2
ip domain name OSPF.lab

username admin privilege 15 password admin1234

line vty 0 4
login local
transport input ssh
crypto key generate rsa general-keys modulus 1024
ip ssh version 2

interface e0/1
ip address 192.168.123.2 255.255.255.0
no shutdown
exit
interface Lo0
ip address 172.16.2.1 255.255.255.0
no shutdown
exit
do wri

R3:

enable
conf t
hostname R3
ip domain name OSPF.lab

username admin privilege 15 password admin1234

line vty 0 4
login local
transport input ssh
crypto key generate rsa general-keys modulus 1024
ip ssh version 2

interface e0/3
ip address 192.168.13.3 255.255.255.0
no shutdown
exit
interface e0/1
ip address 192.168.123.3 255.255.255.0
no shutdown
exit
interface Lo0
ip address 172.16.3.1 255.255.255.0
no shutdown
exit
do wri

R4:

enable
conf t
hostname R4
ip domain name OSPF.lab

username admin privilege 15 password admin1234

line vty 0 4
login local
transport input ssh
crypto key generate rsa general-keys modulus 1024
ip ssh version 2

interface e0/2
ip address 192.168.14.4 255.255.255.0
no shutdown
exit
interface Lo0
ip address 8.8.8.8 255.255.255.0
no shutdown
exit
do wri


2. Cấu hình OSPF đảm bảo tất cả các IP có thể ping thấy nhau

R1:

ena
conf t
router ospf 1
exit
!
int rang e0/1 ,e0/3, lo 0
ip ospf 1 are 0
exit
int rang e0/2
ip ospf 1 are 1
exit
end
wri

R2:
ena
conf t
router ospf 1
exit
!
int rang e0/1 
ip ospf 1 are 0
exit
int lo 0
ip ospf 1 are 2
exit
end
wri

R3:
ena
conf t
router ospf 1
exit
!
int rang e0/1 ,e0/3, lo 0
ip ospf 1 are 0
exit
end
wri

R4:
ena
conf t
router ospf 1
exit
!
int rang e0/2
ip ospf 1 are 1
exit
int lo 0
ip ospf 1 are 1
exit
end
wri


Kiểm tra:

  • Bảng neighbor của các router

R1:

R1#show ip ospf neighbor 

Neighbor ID     Pri   State           Dead Time   Address         Interface
172.16.2.1        1   FULL/BDR        00:00:38    192.168.123.2   Ethernet0/1
172.16.3.1        1   FULL/DR         00:00:39    192.168.123.3   Ethernet0/1
172.16.3.1        1   FULL/DR         00:00:36    192.168.13.3    Ethernet0/3
8.8.8.8           1   FULL/DR         00:00:30    192.168.14.4    Ethernet0/2
R1#
R2:
R2#show ip ospf neighbor 

Neighbor ID     Pri   State           Dead Time   Address         Interface
172.16.1.1        1   FULL/DROTHER    00:00:32    192.168.123.1   Ethernet0/1
172.16.3.1        1   FULL/DR         00:00:32    192.168.123.3   Ethernet0/1
R2#
R3:
R3#show ip ospf neighbor 

Neighbor ID     Pri   State           Dead Time   Address         Interface
172.16.1.1        1   FULL/DROTHER    00:00:31    192.168.123.1   Ethernet0/1
172.16.2.1        1   FULL/BDR        00:00:30    192.168.123.2   Ethernet0/1
172.16.1.1        1   FULL/BDR        00:00:36    192.168.13.1    Ethernet0/3
R3#
R4:
R4#show ip ospf neighbor 

Neighbor ID     Pri   State           Dead Time   Address         Interface
172.16.1.1        1   FULL/BDR        00:00:36    192.168.14.1    Ethernet0/2
R4#

Tất cả các router đã thiết lập được quan hệ láng giềng

  • Bảng định tuyến của các router
R1:
R1#show ip route ospf
Codes: L - local, C - connected, S - static, R - RIP, M - mobile, B - BGP
       D - EIGRP, EX - EIGRP external, O - OSPF, IA - OSPF inter area 
       N1 - OSPF NSSA external type 1, N2 - OSPF NSSA external type 2
       E1 - OSPF external type 1, E2 - OSPF external type 2
       i - IS-IS, su - IS-IS summary, L1 - IS-IS level-1, L2 - IS-IS level-2
       ia - IS-IS inter area, * - candidate default, U - per-user static route
       o - ODR, P - periodic downloaded static route, H - NHRP, l - LISP
       a - application route
       + - replicated route, % - next hop override

Gateway of last resort is not set

      8.0.0.0/32 is subnetted, 1 subnets
O        8.8.8.8 [110/11] via 192.168.14.4, 00:36:36, Ethernet0/2
      172.16.0.0/16 is variably subnetted, 4 subnets, 2 masks
O IA     172.16.2.1/32 [110/11] via 192.168.123.2, 00:35:15, Ethernet0/1
O        172.16.3.1/32 [110/11] via 192.168.123.3, 00:35:15, Ethernet0/1
                       [110/11] via 192.168.13.3, 00:35:15, Ethernet0/3
R1#
R2:
R2#show ip route ospf
Codes: L - local, C - connected, S - static, R - RIP, M - mobile, B - BGP
       D - EIGRP, EX - EIGRP external, O - OSPF, IA - OSPF inter area 
       N1 - OSPF NSSA external type 1, N2 - OSPF NSSA external type 2
       E1 - OSPF external type 1, E2 - OSPF external type 2
       i - IS-IS, su - IS-IS summary, L1 - IS-IS level-1, L2 - IS-IS level-2
       ia - IS-IS inter area, * - candidate default, U - per-user static route
       o - ODR, P - periodic downloaded static route, H - NHRP, l - LISP
       a - application route
       + - replicated route, % - next hop override

Gateway of last resort is not set

      8.0.0.0/32 is subnetted, 1 subnets
O IA     8.8.8.8 [110/21] via 192.168.123.1, 00:35:24, Ethernet0/1
      172.16.0.0/16 is variably subnetted, 4 subnets, 2 masks
O        172.16.1.1/32 [110/11] via 192.168.123.1, 00:35:24, Ethernet0/1
O        172.16.3.1/32 [110/11] via 192.168.123.3, 00:35:34, Ethernet0/1
O     192.168.13.0/24 [110/20] via 192.168.123.3, 00:35:34, Ethernet0/1
                      [110/20] via 192.168.123.1, 00:35:24, Ethernet0/1
O IA  192.168.14.0/24 [110/20] via 192.168.123.1, 00:35:24, Ethernet0/1
R2#
R3:
R3#show ip route ospf
Codes: L - local, C - connected, S - static, R - RIP, M - mobile, B - BGP
       D - EIGRP, EX - EIGRP external, O - OSPF, IA - OSPF inter area 
       N1 - OSPF NSSA external type 1, N2 - OSPF NSSA external type 2
       E1 - OSPF external type 1, E2 - OSPF external type 2
       i - IS-IS, su - IS-IS summary, L1 - IS-IS level-1, L2 - IS-IS level-2
       ia - IS-IS inter area, * - candidate default, U - per-user static route
       o - ODR, P - periodic downloaded static route, H - NHRP, l - LISP
       a - application route
       + - replicated route, % - next hop override

Gateway of last resort is not set

      8.0.0.0/32 is subnetted, 1 subnets
O IA     8.8.8.8 [110/21] via 192.168.123.1, 00:36:00, Ethernet0/1
                 [110/21] via 192.168.13.1, 00:36:00, Ethernet0/3
      172.16.0.0/16 is variably subnetted, 4 subnets, 2 masks
O        172.16.1.1/32 [110/11] via 192.168.123.1, 00:36:00, Ethernet0/1
                       [110/11] via 192.168.13.1, 00:36:00, Ethernet0/3
O IA     172.16.2.1/32 [110/11] via 192.168.123.2, 00:36:00, Ethernet0/1
O IA  192.168.14.0/24 [110/20] via 192.168.123.1, 00:36:00, Ethernet0/1
                      [110/20] via 192.168.13.1, 00:36:00, Ethernet0/3
R3#
R4:
R4#show ip route ospf
Codes: L - local, C - connected, S - static, R - RIP, M - mobile, B - BGP
       D - EIGRP, EX - EIGRP external, O - OSPF, IA - OSPF inter area 
       N1 - OSPF NSSA external type 1, N2 - OSPF NSSA external type 2
       E1 - OSPF external type 1, E2 - OSPF external type 2
       i - IS-IS, su - IS-IS summary, L1 - IS-IS level-1, L2 - IS-IS level-2
       ia - IS-IS inter area, * - candidate default, U - per-user static route
       o - ODR, P - periodic downloaded static route, H - NHRP, l - LISP
       a - application route
       + - replicated route, % - next hop override

Gateway of last resort is not set

      172.16.0.0/32 is subnetted, 3 subnets
O IA     172.16.1.1 [110/11] via 192.168.14.1, 00:37:41, Ethernet0/2
O IA     172.16.2.1 [110/21] via 192.168.14.1, 00:36:31, Ethernet0/2
O IA     172.16.3.1 [110/21] via 192.168.14.1, 00:36:31, Ethernet0/2
O IA  192.168.13.0/24 [110/20] via 192.168.14.1, 00:37:41, Ethernet0/2
O IA  192.168.123.0/24 [110/20] via 192.168.14.1, 00:37:41, Ethernet0/2
R4#


Các route đã được học đầy đủ. Các ký hiệu O IA là route học được OSPF của các area khác


3. Hiệu chỉnh Router - ID cho các router là:

  • R1: 1.1.1.1
  • R2: 2.2.2.2
  • R3: 3.3.3.3
  • R4: 4.4.4.4


R1:

ena
conf t
router ospf 1
router-id 1.1.1.1
end
!
wri

R2:

ena
conf t
router ospf 1
router-id 2.2.2.2
end
!
wri


R3:

ena
conf t
router ospf 1
router-id 3.3.3.3
end
!
wri

R4:
ena
conf t
router ospf 1
router-id 4.4.4.4
end
!
wri


Kiểm tra:

Noted: Chúng ta phải thực hiện xóa process của ospf trên các router sau khi hiệu chỉnh router-id bằng lệnh clear ip ospf process

R1, R2, R3, R4:

clear ip ospf process

Reset ALL OSPF processes? [no]: yes

Thực hiện lại lênh show ip ospf neighbor

R1#show ip ospf neighbor 

Neighbor ID     Pri   State           Dead Time   Address         Interface
2.2.2.2           1   FULL/DR         00:00:31    192.168.123.2   Ethernet0/1
3.3.3.3           1   FULL/BDR        00:00:33    192.168.123.3   Ethernet0/1
3.3.3.3           1   FULL/DR         00:00:39    192.168.13.3    Ethernet0/3
4.4.4.4           1   FULL/BDR        00:00:31    192.168.14.4    Ethernet0/2
R1#


4. Hiệu chỉnh quá trình bình bầu DR/BDR kết nối giữa:

  • R1-R2-R3:  đảm bảo R1 là DR; R2 là BDR


Kiểm tra trước khi cấu hình:

R3#show ip ospf neighbor 

Neighbor ID     Pri   State           Dead Time   Address         Interface

1.1.1.1               1   FULL/DROTHER    00:00:32    192.168.123.1   Ethernet0/1

2.2.2.2               1   FULL/DR         00:00:34    192.168.123.2   Ethernet0/1

1.1.1.1               1   FULL/BDR        00:00:32    192.168.13.1    Ethernet0/3

R3#


Chúng ta thấy hiện tại việc bình bầu chưa đúng với yêu cầu, bây giờ chúng ta tiến hành hiệu chỉnh prority của ospf trên các cổng kết nối trên các router này. 


Hiệu chỉnh xong, NHỚ XÓA process của ospf bằng lệnh: clear ip ospf process và show ip ospf neighbor kiểm tra lại


R1:
interface  Ethernet0/1
ip  ospf  priority  10

R2:
interface  Ethernet0/1
ip  ospf  priority 5

Kiểm tra trên R3:

R3#show ip ospf neighbor 

Neighbor ID     Pri   State           Dead Time   Address         Interface

1.1.1.1              10   FULL/DR         00:00:38    192.168.123.1   Ethernet0/1

2.2.2.2              5   FULL/BDR        00:00:37    192.168.123.2   Ethernet0/1

1.1.1.1              1   FULL/BDR        00:00:36    192.168.13.1    Ethernet0/3

R3#


R1-R2-R3: đã đáp ứng yêu cầu đặt ra.


  • R1-R4: đảm bảo R1 luôn là DR

Trong trường hợp này R1 luôn luôn là DR nên chúng ta cấu hình priory trên cổng Et0/2 của R4 = 0 để R4 không tham gia bình bầu DR

R4:
interface  Ethernet0/2
ip  ospf  priority 0


R4#show ip ospf neighbor 

Neighbor ID     Pri   State           Dead Time   Address         Interface

1.1.1.1           1   FULL/DR         00:00:32    192.168.14.1    Ethernet0/2

R4#


Đáp ứng yêu cầu đặt ra

5. Hiệu chỉnh metric để R3 đi đến Loopback0 của R4 hay R3 đến ip 8.8.8.8 phải đi qua cổng E0/3 của R1

Kiểm tra trước khi cấu hình:

R3#show ip route 8.8.8.8

Routing entry for 8.8.8.8/32

  Known via "ospf 1", distance 110, metric 21, type inter area

  Last update from 192.168.123.1 on Ethernet0/1, 00:11:51 ago

  Routing Descriptor Blocks:

    192.168.123.1, from 1.1.1.1, 00:11:51 ago, via Ethernet0/1

      Route metric is 21, traffic share count is 1

  * 192.168.13.1, from 1.1.1.1, 00:11:51 ago, via Ethernet0/3

      Route metric is 21, traffic share count is 1

R3#


Hiện có 2 hướng để đi đến ip 8.8.8.8 là đi ra khỏi cổng E0/1 và E0/3

R3:

interface Ethernet0/1

ip ospf cost 150


Kiểm tra

R3#show ip route 8.8.8.8

Routing entry for 8.8.8.8/32

  Known via "ospf 1", distance 110, metric 21, type inter area

  Last update from 192.168.13.1 on Ethernet0/3, 00:18:01 ago

  Routing Descriptor Blocks:

  * 192.168.13.1, from 1.1.1.1, 00:18:01 ago, via Ethernet0/3

      Route metric is 21, traffic share count is 1

R3#


Bây giờ chỉ còn lại 1 hướng đi là duy nhất, đáp ứng yêu cầu đặt ra.


Xong!

/*header slide*/